Installing for students with MAC
- Close all Office programs: Word, Excel, Power Point, Outlook, etc.
- If you've used EndNote before, delete your old EndNote version located in your Applications.
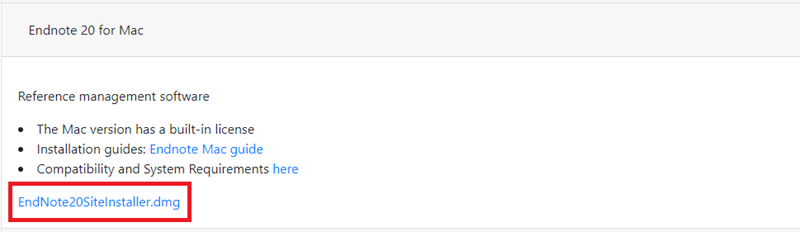
DON'T delete your library and it's connected data folder if you want to continue using this library. - Open https://sw.sdu.dk
- Select EndNote 20 for Mac.
- Download the EndNote20SiteInstaller file.dmg.
- The file is now downloaded to your computer in the Download folder.
- Depending on the browser, the file will be visible in either the lower left corner (Chrome) or at the top right corner (Safari and Firefox).
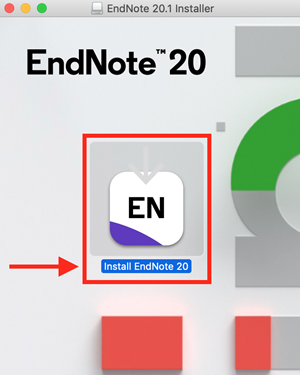
- Click the downloaded file so the box below opens.
- Double-click Install EndNote 20.
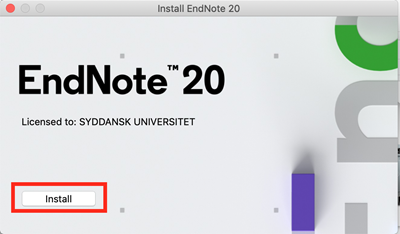
- A new box opens: select Install.
- The program is unpacked and a Customizer wizard box is displayed.
- Press: Next, Next, enter your Mac code and press Done.
- EndNote is now installed on your Mac and opens automatically.
- Now you can find EndNote in your Applications. For easy access drag the application into your dock.
-
Open Word and make sure you've got a new tab called EndNote 20. If it is not visible, try the following:
- Close Word.
- Open EndNote 20.
- On the EndNote 20 tab, locate and run the Customizer Wizard.
- Make sure that Cite while you write is selected when you complete the customizer.
- Open Word again, and the EndNote 20 tab should now be visible.
-
After the program is installed, you can delete the installation file from your download folder.
-
If you've used EndNote before, the library you last opened opens. Remember to set up library synchronization for your online EndNote account.
- If you haven't used EndNote before, EndNote opens without a library and you have to create it. Follow below:
- Select File / New.

- Create your library by naming it.
- EndNote suggests by default MyEndnoteLibrary.enl, BUT you need to change this into something more personal, e.g. YourName.enl.
- Under Documents, save your library locally on your computer.
- IMPORTANT: The EndNote library must be stored locally in the Documents folder or a subfolder in Documents.
-
The EndNote library opens after you press Save.
-
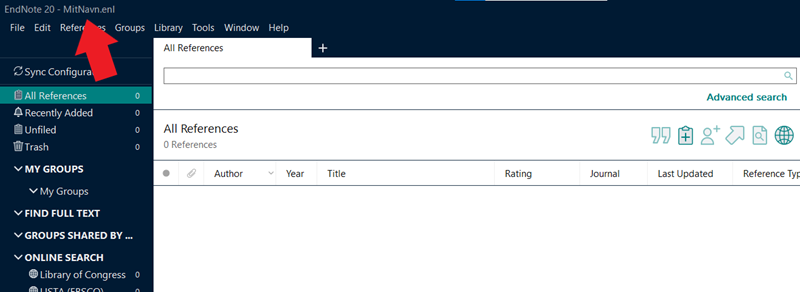
TIP: Maximize or expand the window to begin with, so you can see all the features. You can spot the name of your library in the left corner.
-
- In the future, when you open EndNote through the icon in the dock bar, this library will open.
- In Finder, select Applications.
- Right-click and tap View in the overlying folder.
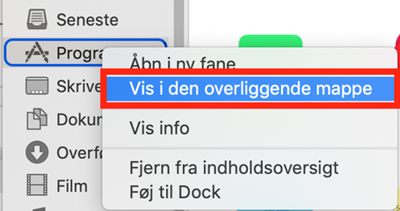
- Choose MacintoshHD/Users/Your Name (look for the house).

- Inside this 'house' your the local document folder is accessible. (If you don't see it, create a folder and choose for yourself what the folder should be called.)
- The location must be as below:

- You may want to 'drag' the house over to Favorites in the menu on the left, so you can easily get there again.
NOTE - use only 1 library!
You can create multiple libraries, but we recommend that you use only one library for several reasons:
- You can only sync from one library to your online EndNote account. If you try from libraries other than the first, EndNote will merge the libraries, and then add them together in your online version.
- If you need a breakdown, you can create groups for selected references. In addition, you can create overcategoing for your groups so that one type of group comes in one category and another type of group in another.
ALSO
- If you experience problems using EndNote, you may need to update your Word program. Remember that you have free Office 365 when you are a SDU student.
- You may also need to update your Mac OS system. Press the Apple in the upper-left corner of your Mac --> choose About This Mac --> click Software Update.